This is a list of all the tips displayed in the game as a loading screen tip.
| Image | Title | Loading Tip |
|---|---|---|
| No Image | Player Level | As your player level increases, you'll be able to register more friends, and new facilities will become accessible. |
| No Image | Unbinding | If you unbind dragons, weapons, and adventurers, you'll be able to level them up even higher. |
| No Image | Mana Circles | You can learn new skills and abilities for your adventurers by unlocking mana nodes on their mana circles. |
| No Image | Upgrading Adventurers | Use crystals to level up your adventurers on the Upgrade screen. |
| No Image | Upgrading Dragons | Use dragonfruit to level up your dragons on the Upgrade screen. |
| No Image | Upgrading Weapons | Use whetstones to level up your weapons on the Upgrade screen. |
| No Image | Auto Upgrading | Tap the Auto button on any Upgrade screen to select upgrade materials with just one tap. |
| No Image | Adventurers | Whenever a new adventurer joins your roster, try adding them to a team to see what they're capable of! |
| No Image | Equipment | Be sure to remember to equip new weapons, dragons, and wyrmprints as you acquire them. |
| No Image | Recovery Skills | When forming a team, be sure to include an adventurer with recovery skills! |
| No Image | More About Gifts | Give gifts to dragons in the Dragon's Roost, and they'll return the favor with a gift of their own, increasing your bond. |
| No Image | Bond | If your bond with a dragon is strong, your shapeshifting time will be slightly extended. |
| No Image | Dragon Preferences | If your gift is to a dragon's liking, you'll form an even stronger bond with that dragon. |
| No Image | Adventurer Stories | Unlock certain nodes in an adventurer's mana circle to acquire new chapters in their adventurer stories. |
| No Image | Dragon Stories | Strengthen your bond with a dragon to unlock new dragon stories. |
| No Image | Storage Expansions | Visit the shop to expand your storage capacity for weapons, dragons, or wyrmprints. |
| No Image | Treasure Trade | Certain items can be exchanged for treasure at the Treasure Trade area of the Shop. |
 |
Dragon Obelisks | Destroy dragon obelisks when on quests to quickly fill your dragon gauge. |
 |
Switching Adventurers | Tap an adventurer's icon to switch control over to that adventurer. |
 |
Helpers | When you bring a helper along on a quest, you can utilize one of his or her skills as well. |
 |
Endeavors | After clearing all endeavors on a quest, you'll receive a completion reward. |
 |
The Minimap | Tap the minimap to enlarge it. Tap it once again to return the map to its original state. |
 |
The Lock Feature | Tap the lock icon on your favorite weapons, dragons, and wyrmprints to prevent them from being accidentally sold. |
 |
Selling and Parting Ways | You can sell weapons and wyrmprints or part ways with dragons from the Collection menu. |
 |
Facilities | Use the Build menu on the Castle Grounds screen to construct facilities that can help boost the attributes of your adventurers. |
 |
Gifts | You can buy and give gifts to your dragons at the Dragon's Roost. The gifts available for purchase change depending on what day of the week it is. |
 |
Notices | Stay up-to-date with the latest Dragalia Lost news and info by tapping the Notices button. |
 |
Help | Tap More to access the Help/Support section if you're stuck or in need of assistance. |
 |
Helper Settings | You can select which adventurer your friends will be able to use in Helper Settings. |
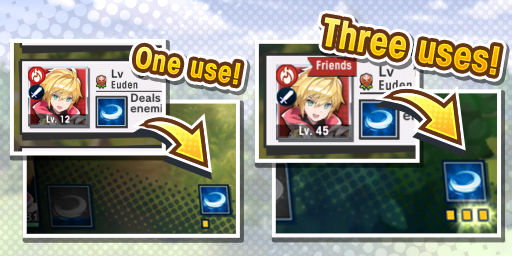 |
Friends | When someone becomes a friend, the number of times you can use their adventurer's helper skill increases. |
 |
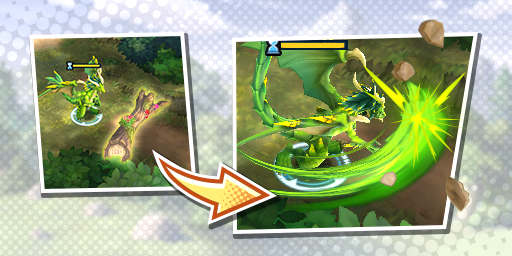
Shapeshifting | When shapeshifting, enemy attacks won't reduce HP, but will instead deplete your dragon gauge. |
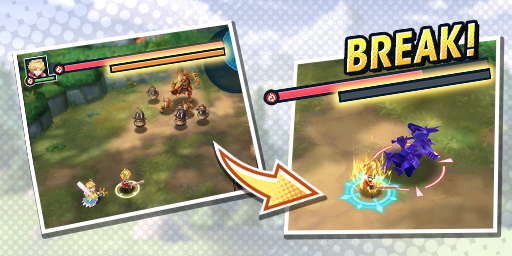 |
Breaking Enemies | Repeatedly attacking enemies that are in an overdrive state will eventually break their guard, rendering them temporarily immobile. |
 |
Elements | Elements have strengths and weaknesses, so be sure to use them to your advantage to deal greater damage in battle. |
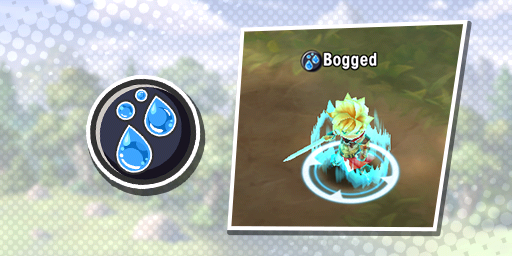 |
Afflictions: Bog | When bogged, your movement will be slowed, and you will take more damage than usual. |
 |
Afflictions: Burn | When burned, you will take damage for a limited amount of time. |
 |
Afflictions: Paralysis | When paralyzed, you will take damage for a limited amount of time, and your movements will often be interrupted. |
 |
Afflictions: Poison | When poisoned, you will take damage for a limited amount of time. |
 |
Afflictions: Stun | When stunned, you will be unable to move or attack. |
 |
Daily Quests | You can obtain materials for unbinding from daily event quests and other sources. |
 |
Avenue to Power | If you're looking for materials to upgrade your adventurers, try tackling the Avenue to Power event quest. |
 |
Suggested Might | Always check the Suggested Might value before setting out on a quest! |
 |
Quest Elements | When preparing for a quest, try to form a team that is ideally suited for that quest's elemental alignment. |
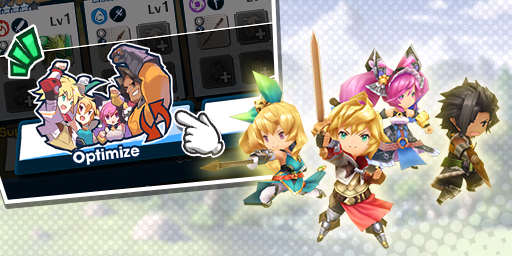 |
The Optimize Button | Use the Optimize button on the quest setup screen to quickly form a suitable team for the quest you're about to challenge. |
 |
Co-abilities | Co-abilities are unique abilities whose properties impact the entire team! |
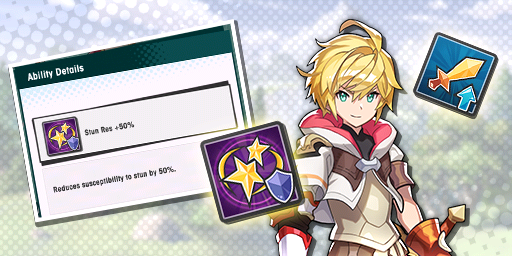 |
Abilities | Each adventurer has access to unique abilities that provide various helpful effects! |
 |
The Halidom | Level up the Halidom to expand the areas on the castle grounds in which facilities can be built. |
 |
Item Details | From an item's Item Details screen, you can jump to quests that reward the item you're inspecting, or open the menu where that item can be used. |
 |
Dragalia Life | Need a break? Head to the More screen to check out Dragalia Life, the official comic strip of Dragalia Lost! It's free! |
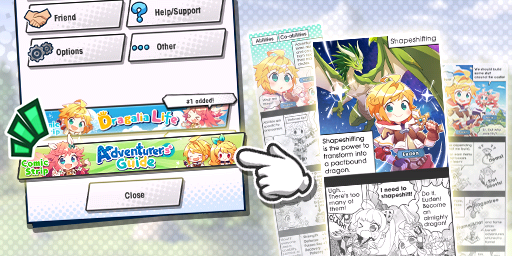 |
Adventurers' Guide | If you're stuck and need some tips, be sure to check out the Adventurers' Guide comic! |
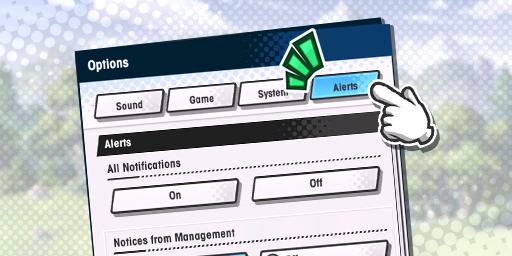 |
Alerts | You can customize which alerts you'd like to receive in the Options menu. |
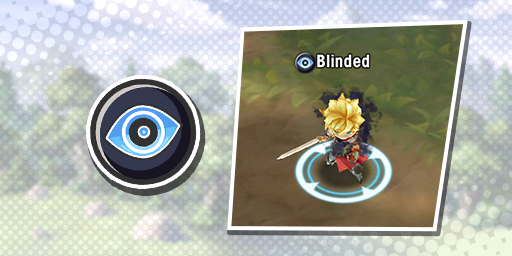 |
Afflictions: Blindness | When blinded, your attacks and skills may miss their targets. |
 |
Afflictions: Curse | When cursed, you will be unable to use skills or helper skills for a limited amount of time. |
 |
Afflictions: Freeze | When frozen, you will become unable to act for a limited amount of time. This can be remedied by having a team member attack you. |
 |
Afflictions | Shapeshifting is not possible when suffering from an affliction. |
 |
Home Design | In the System section of the Options menu, you can toggle your Home display preference between 3D and 2D visuals. |
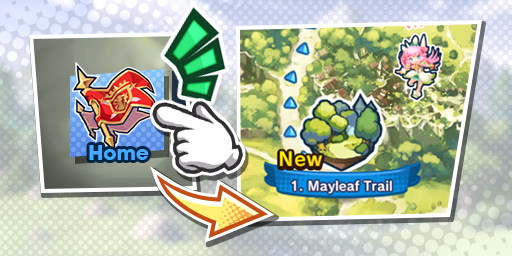 |
Quests Shortcut | Hold your finger on the Home button at the bottom of the screen to jump straight to the Quests menu. |
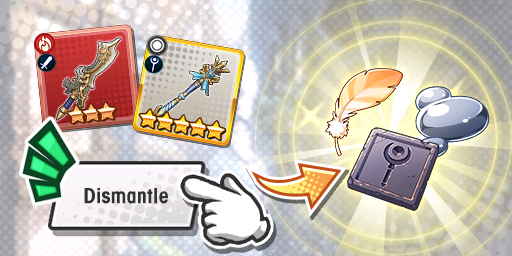 |
Dismantling | If you dismantle a weapon in the Crafting menu, you can regain all of the materials you used to make it. |
 |
Dragon Trials | Trade in spheres earned from dragon trials for actual dragons. |
 |
More About Dragon Trials | The scales you gain from dragon trials can be used to unlock mana circle nodes. |
 |
Advanced Dragon Trials | Trade in greatspheres earned from advanced dragon trials for facilities and 5★ dragons. |
 |
Skip Tickets | Skip tickets are handy items that allow you to clear quests without having to actually fight. |
 |
Quest Details | Tap the quest details box during a quest to view that quest's clear conditions, endeavors, and more. |
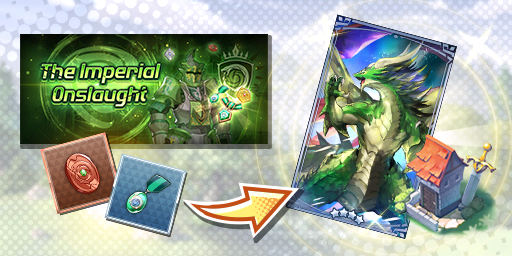 |
The Imperial Onslaught | Items gained from The Imperial Onslaught event can be exchanged for facilities and wyrmprints. |
 |
Co-op Communication | Use stickers to communicate with other players during co-op play! |
 |
Destructible Obstacles | Some obstacles in the environment can only be destroyed when in dragon form. |
 |
Sprinting | After moving for a certain amount of time, you'll automatically begin to sprint— but only if no enemies are present. |
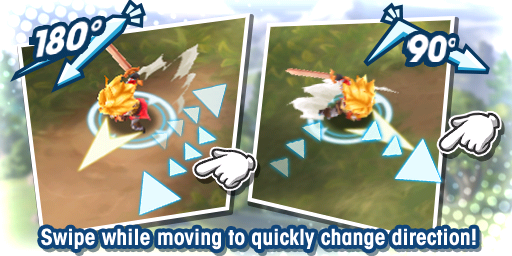 |
Quick-Turn Settings | Quick-Turn settings, which allow you to turn on a dime at 90- or 180-degree angles, can be adjusted in the Options menu. |
 |
Camera Zoom | Adjust the camera's field of display by pinching in or out when on a quest. |
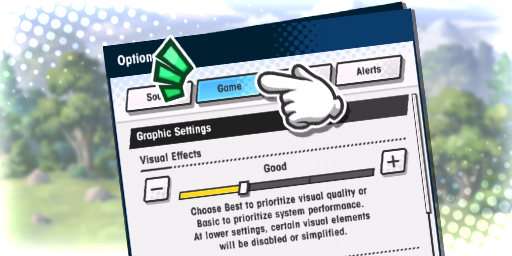 |
Graphics Settings | If gameplay ever feels sluggish or unresponsive, try choosing a lower graphics setting to improve performance. |
 |
Sound Settings | Head to the Sound section of the Options menu to turn song vocals on or off, or adjust the volume of sound effects and voices. |
 |
Castle Grounds Shortcut | Hold your finger on the Castle button at the bottom of the screen to jump straight to the Castle Grounds. |
 |
Elisanne | A holy knight, or Paladyn, of the llian Church whose sworn duty is to defend both the Auspex and the Ilian clergy. However, she recently found herself parting ways with them. |
 |
Ranzal | A battle-tested mercenary with a foul mouth and a decent heart. He can be counted on to look after his friends and hold true to his ideals no matter what troubles may come his way. |
 |
Cleo | A child of the wood who is skilled in the healing arts. She has guarded the Mistholt for many years at the request of her former master. |
 |
Notte | A pint-sized faerie who is always upbeat and genuine. She can be counted on to provide endless support and confidence, no matter how bleak things may seem. |
 |
Luca | A sylvan youth from a village in the forest. Though likable, his love of mischief often lands him in trouble—much to his sister's dismay. |
 |
Leif | The captain of the Alberian Royal Knights. His loyalty and love for country serve as an ideal model for all who aspire to be a knight. |
 |
Emile | The sixth in line to the Alberian throne. Incredibly haughty and prideful, he often gets upset when things don't go his way. |
 |
Harle | The chief of the Capital Guard. His bold smile and bombastic manner are unusual for one in his position, but he is also a cunning strategist. |
 |
The Kingdom of Alberia | The kingdom where Euden and his friends reside. The royal family are descendants of the hero Alberius, who founded the kingdom along with his pactbound dragons. |
 |
Pactstones | Crystals that serve as proof of a dragonpact. A person in possession of a pactstone can call upon a dragon's power at will. |
 |
Sacred Shards | Shards with holy properties. They have the power to ward off fiends, and have been placed around the kingdom in order to protect its people from a grave threat. |
 |
Dragons | Mystical beings that govern mana and natural phenomena. They bring blessings and destruction in equal measure, and are both feared and revered by all the people of the world. |
 |
Sylvans | A race of people often referred to as "children of the wood." They worship nature in all its forms, and subsist mainly on foraging and hunting. |
 |
Alberius the Founder | The man who founded the Kingdom of Alberia. He made pacts with various dragons, and used this power to bring peace to Grastaea. |
|
The Goddess Ilia | The first Auspex of the Ilian Church. She was a famed mage who sealed away a great demon with the help of the dragon Elysium. |
|
The Dyrenell Empire | An evil empire that once existed on the continent. Their cruelty and injustice was unending, and they tormented humans and dragons alike. |
|
Dragonblood | A special power possessed by the royal family of Alberia. Only those who wield it have the ability to enter a dragonpact. |